Showing posts with label Blogger. Show all posts

Thursday, 16 May 2013

Ensuring In-Depth Uniqueness With Top 10 Duplicate Content Checking Tools


duplicate checker tools
Uniqueness is a highly desired virtue. With the world evolving faster than expected all that is needed to stay afloat are some pieces of unique brilliance. Write ups over the years have become an inspirational move to attract audience. Writing informative content pertaining to plethora of topics with keeping the originality quotient intact has been a rare attribute off late. Copying work pieces and pasting it in desired places have been predominant as people tend to minimize their work load significantly. To curb this growing plagiaristic approach, many online and offline tools have been developed, which in a few clicks can separate the original content from the copied one exposing the inefficacies of the writer or rather the concept stealer.

Top Ten Duplicate Content Checking Tools:

  • Copyscape- the most predominant content checking tool which can be availed in the free or paid manner. Initially this software started off as free but with the growing popularity the rates per check has been fixed which ranges around $10 for making around 200 searches. Each search can be as large as 2000 or more words. This comes with inbuilt copy sentry tool which duly informs the user about the source of the copied content.
  • CopyGator- this is free software which informs the registered user about when and where his uploaded piece is getting used. This is great at monitoring the feeds based on RSS giving complete information about the copied content.
  • Plag Spotter- this online tool allows the user to check the extent of the copy on a periodic basis. This gives the option of checking down the entire site or a selected portion by feeding the URL in the search bar. This also facilitates sentence based checking for more intricate demands.
  • Virante- this advanced tool uses the registered domain to look for likewise content and inform accordingly. Uses the current Google cache method and also looks at the PR dispersion to enhance the checking environment.
  • Dupli Checker- this free online tool allows the user to upload large documents in the form of attachments to undertake a complete holistic search.
  • Plagiarisma- this online tool can be availed over a wide range of platforms including the android and windows one. Some added advantages include spelling checker and other pragmatic tools for enhancing usability.
  • Article Checker- this online tool checker is best applied in SEO based purposes and gives the liberty to the users for getting their articles and larger text pieces checked.
  • Dupe Cop- this checker comes with many added benefits allowing the user to compare different article pieces and to bring out the percentage match. Mostly used by those writing PLR based stuffs to be uploaded on websites. With further interface advancement this tool allows checking to be done across 4 article versions to bring out the smallest of copied changes.
  • Plagium- a free content checker which can check up to 25,000 Characters in one go.
  • Similar Page Checker- this is an attractive SEO based checking tool which allows the webmasters to look into the similarity count of their web pages with those of the other competitors.
We can thus conclude that online methods have been strengthened over the years to enhance the checking and comparing strategies to kill the curse of plagiarism. With this hindrance out of the way, greater detailing of work and substance can be done providing more quality at our disposal.

How to Add Contact Form Widget to Blogger

Contact Form for Blogger is one of the most awaited feature in Blogger. Here, I am going to explain How toWikipediasearch box to Blogger, and last month it updated its template HTML editor. Now Blogger hasnewBlogger template HTML editor. No doubt Blogger is trying its best. So, now we have a new official contact form widget for Blogger (Blogspot) blogs. Here is how to add it to your blog. Check out the quick tutorial below.add Contact Form to Blogger (BlogSpot) blogs. Blogger is improving its features and layout consistently. Blogger had first brought


Official Contact Form for Blogger


Blogger user, usually use third party contact form on their Blogspot blogs. Because there was not any official widget for contact form in Blogger. But the wait is finally over, if you are a blogger user and use any third party contact form to your Blogger blog, just remove it, Blogger has just introduced a new “Contact Form” widget for Blogger blogs today.
Since Blogger has launched an official contact form widget for Blogger, then why not go for it. And it’s always a good idea to use official widget to your blog rather than using any third party widget. Now if you blog reader enters a valid name, email address, and message into the contact form, the blog owner (you) will receive the message via the contact form from their email address.

HOW TO ADD CONTACT FORM WIDGET TO BLOGGER.

So if you are ready to add Contact form widget to your blogger blog. It is so easy to add official contact form widget to you blog, you just need to add a new Gadget to your Blog named as Contact Form. However, here is a quick instruction you need to follow in order to add Contact form to Blogger.

Adding Contact Form to Blogger
As you are a Blogger user for a long time, you probably would have known How to add widget to Blogger’s blog. But if you are new to Blogger, don’t worry it’s too easy to add new widget to Blogger.


Simply Go to Blogger>> Your Blog>> Layout>> Add Gadget.
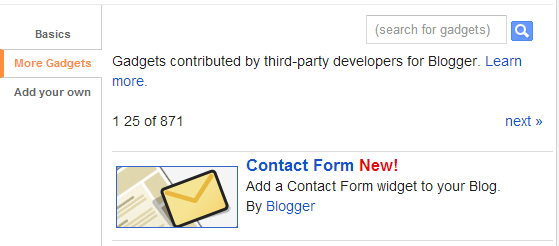
A Pop-up box will open, Now look for the Contact Form.
The Contact Form widget is located under the "More Gadgets" tab. See the picture below.


Now click on this widget and give a title (optional) and hit Save button.
Now drag this widget where you this widget to show i.e. Sidebar, Header and Footer.
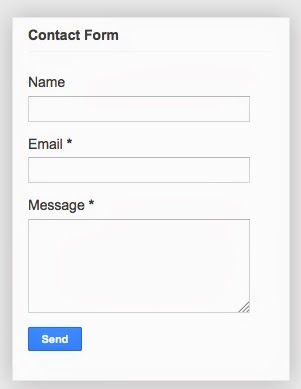
Congratulations! You have successfully added Contact form widget to your blog. Now check your blog, The Blogger official contact form widget will looks like this.


Hope you like this tutorial to add Contact form to Blogger. What is your view about this new official Blogger contact form for its blogs. Share your view via comment box below.

Tuesday, 14 May 2013

How To Change Blogger Mobile Template To Mobstac

For over a year now, I have been using mobstac to power the mobile version of my blogbecause it allows me to display custom and google ads to people that read my blog withOpera mini and some other mobile browsers. 

If you're monetizing your blogger blog with Google Adsense and have activated the blogger mobile template, anyone that visits your blog with Opera browser will not see any ad on your blogger-powered mobile site. Just imagine how much money you will be losing if high percentage of your mobile traffic use opera mini browser.

Hence, if you want to be making money from your mobile traffic especially those that access your blog with opera mini, you have to use mobstac and ensure they only see the mobstac version of your blog and not the blogger-powered mobile site. 

If you want your blog readers to see your mobstac site instead of the blogger mobile template whenever they access your blog on their smartphones, all you just need to do is to add the mobstac redirection code to your blogger html and deactivate the blogger mobile template.

For you to add the mobstac code to your blog's html, you must have an approved mobstac account and you must have set up "m" subdomain for the mobstac site egm.ogbongeblog.com. Hence, if you are still using www.somename.blogspot.com, you will have to change your blogspot to .com to get started. I can set up a custom domain for your blogger blog if you don't know how to get it done. 

To deactivate blogger mobile template, log in to your blogger dashboard, click on "Template". Click on the settings icon under "mobile". Select "No. Show desktop template on mobile devices." and SAVE.

Efficient Email Subscription Box for Blogger


Efficient Email Subscroption Box

Now a days, Blogging is increasing with the great speed and every talent Blogger is going to success. The readers or email subscribers are also helpful for getting success in BlogoSphere. Because without any reader or subscriber a blog in nothing. These readers help us to build the email subscription list and makes our blog’s ranking better. There are tons of method to build the email subscription list and here I’m going to share the one of the best method to increase your email subscribers. So, we will use the new “Efficient Email Subscription” widget to boost your subscribers. Basically, This is the attractive widget which will attract your readers to subscribe you. The best place of adding this widget in below every post. So this will be added below the every post of your blog. We have not used any heavy web developing language like JavaScript to build this but we’ve used HTML and CSS3 to make this fancy and simple widget. This widget contains of a title, little description, enter email address text area and a dashing subscribe now button with hover effect. However, This widget is working fine on every internet browser, we’ve checked it and you don’t need to worry about that. After telling you something about that subscription box, you might be wanted to install this in your blog. So, friends what are you waiting for? Let’s add this great widget in your blog and boost your subscribers.

Adding Efficient Email Subscription Box In Blogger

  • As usual go to blogger–>Template–>Edit HTML
  • Search for <data:post.body/> in your blogs HTML
  • Now copy and paste below code just after it.
<b:if cond='data:blog.pageType == &quot;item&quot;'>
<style>
.mtc-newsletter-box {width:500px; height:222px; background:#f5f5f5; border:10px solid #ABABAB;padding:5px;}
.mtc-newsletter-box h1{font-size:20px; font-weight:bold; color:#444; text-align:center;}
.mtc-newsletter-box p{font-size:16px; font-family:georgia; text-align:center;line-height:25px;}
.mtc-newsletter-box input{background: white url(https://blogger.googleusercontent.com/img/b/R29vZ2xl/AVvXsEgw-1E_2pis2Gk1ceL-Mk8-vsoRd6Ec5GaehaSTyPIVllywEg0cY2_pvYt02VQbLwtIMTKUEMqHSEpJgigbSN4H_mhOtF3PIfDwH92lJmb2TkhXW9QLEPFGfcMfnjUqFKP8UzzWPOqtJCpL/s1600/subscribe-email.png) no-repeat right;font-family: Georgia, Times, &quot;Times New Roman&quot;, serif;border-radius: 3px;-moz-border-radius: 3px;-webkit-border-radius: 3px;box-shadow: 0 2px 2px #111;-moz-box-shadow: 0 2px 2px #111;-webkit-box-shadow: 0 2px 2px #111;margin: 0px;padding: 0px; border: 1px solid #111 !important;font-size: 15px !important;margin-bottom: 10px !important;padding: 8px 28px 8px 10px !important;width: 80% !important;height: auto !important; box-shadow:2px #ABABAB;}
.mtc-newsletter-box .submit{background:#ABABAB;}
.mtc-newsletter-box .submit:hover{background-color: #444;border: 1px solid #444;color: white;text-decoration: none;}
</style>
<div class='mtc-newsletter-box'>
<h1>Join Our Email Newsletter Now!</h1>
<p>Join over 1,000 people who get free and fresh content delivered automatically each time we publish.</p>
<form action='http://feedburner.google.com/fb/a/mailverify' method='post' onsubmit='window.open(&apos;http://feedburner.google.com/fb/a/mailverify?uri=Feed Burner ID&apos;, &apos;popupwindow&apos;, &apos;scrollbars=yes,width=550,height=520&apos;);return true' target='popupwindow'><div align="center">
<input name='email' onblur='if (this.value == &quot;&quot;) {this.value = &quot;Enter Your Email Address...&quot;;}' onfocus='if (this.value == &quot;Enter Your Email Address...&quot;) {this.value = &quot;&quot;}' size='30' type='text' value='Enter Your Email Address...'/><input name='uri' type='hidden' value='Feed Burner ID'/>
<input name='loc' type='hidden' value='en_US'/>
<input class='submit' type='submit' value='Subscribe Now!'/></div>
</form><a href="http://www.makingdifferent.com" target="blank"><img border="0" src="https://blogger.googleusercontent.com/img/b/R29vZ2xl/AVvXsEio7oeqIKysIvFCrCW4nXIIEkLwDxbCgO7V1WSwLUhLFoLYDF8Gzr8oRF2hgUbHcAEsf9lQxqdEOHtxR-vwtFCLDJCpFcVY8f7N_v-zmqO5SfFuVbPc3VJHxyGypM-LQY3nYiWvlp-5RN4/s1600/blank.png" /></a><a href="http://www.mytechcafe.com" target="blank"><img border="0" src="https://blogger.googleusercontent.com/img/b/R29vZ2xl/AVvXsEio7oeqIKysIvFCrCW4nXIIEkLwDxbCgO7V1WSwLUhLFoLYDF8Gzr8oRF2hgUbHcAEsf9lQxqdEOHtxR-vwtFCLDJCpFcVY8f7N_v-zmqO5SfFuVbPc3VJHxyGypM-LQY3nYiWvlp-5RN4/s1600/blank.png" /></a></div></div>
</b:if>
Replace above red colored text Feed Burner ID with your Feed burner ID
Finally save the template and you have done!

Last Words

So friends, This was our email subscription box which will boost your email subscribers. I hope will like it and if are facing any problem then leave the comments below. One thing I want to tell you that, If you want to share this widget on your blog then you must link back us as credits. Please respect our efforts and I hope you understand.

11 Most Popular Female Bloggers of 2013!


Popular Female bloggers
Today when the biggest competitor of man out there in industry is woman, even the online earning medium too is equally availed by the powerful ladies who know how to cash their talent. It was once perceived that women lack in technical skills and it was somehow true too when the technical work was all limited to the real world, thanks to the online earning strategies, now the chances to make money online are equally available for both-man and woman.
When it comes to blogging, women are a sound contestant of the race and are generating good revenue with their blogs.
Being a female blogger myself, here are a few inspirational women who are known for their work. All data is latest for 2013 especially.  Have a look!

Monday, 13 May 2013

Free advertising of your blog : Entrecard


Entrecard is a simple banner exchange program. The role of entrecard is to provide a platform to gather all bloggers and Site-owner’s at one place and exchange their links.
How it works?Just put a 125×125 banner exchange and your banner is displayed only once per day per site. You get a widget to put it on your blog. You will have to pay certain number of credits (here credits acts like money) to have your banner displayed on widget of specific site. Credits are gained based on people dropping cards on you and you dropping cards on other sites.
My experience says…
It just have been couple of weeks that I’ve placed Entrecard widget on my blog. Well we have had some pretty targeted traffic from Entrecard but its also a lot of work chasing after credits, its very much a case of the big sites get bigger and the smaller sites have to work harder. I liked their scheme because it doesn’t includes Real money. So, for those, who doesn’t want to invest money for publicity can use this service.
How to improve
  • Make sure your widget is on the popular pages on your site. For bloggers, I would suggest to place it on upper side of your sidebar.
  • Place the widget on your site carefully, so it is easily visible to Entrecard-enabled visitors.
  • Buy more ads, on sites where you feel they have a good chance of catching the users eye and interest.
  • Design an attractive, friendly Entrecard appropriate to your site.
  • Drop your card on other blogs wherever you see the widget.
So, go get your Entrecard now or if you have already joined, feel free to drop yours on my widget.
- See more at: http://netrivar.blogspot.in/2013/05/free-advertising-of-your-blog-entrecard.html#sthash.C50jaU6V.dpuf

BloggerLeaf - Blogger Template Free Download


Today I’m excited to share this awesome blogger template with all of you, i love to design themes for blogger and wordpress, also i can convert any wordpress theme to blogger and blogger to wordpress, many of our readers asked me for the software for cloning any themes and always i said that i haven’t any software for cloning themes , it’s my hobbies, expertness and hard working only…
BloggerLeaf is free blogger template, it’s look wise  similar to bloggermint.com with green and white combination and suit with all type of blogs as well. In this template i have also designed awesome blogger threaded comments system with helps of  CSS, but Earlier some week, Google launched its new Google+-powered commenting system for Blogger, then you can easily set up Google+ commenting system in to this template. ( Read more about how to use google+ comments on blogger )

Most of designers makes unreadable CSS and HTML codes in to template because they gives you template in free of cost they trying to add many hidden links in to template then after applying the template to your blog you can’t customize or edit into template and also theirs hidden links bad effects to your SEO (Search Engine Optimization), so be aware from it, but in this template infact in my all templates you can edit and customize template easily, and always SEO Optimized as well, that’s why thousands of bloggers uses our templates for their blog. :)

Live Preview :

BloggerLeaf-Blogger Template by Making Different Click Thumb to Enlarge

Page Layout Preview

LayoutClick Thumb to Enlarge

Features :

  • SEO Optimization
  • Adsense Optimization
  • Numbered Page Navigation
  • Top Navigation Menu
  • Fast Loading
  • Fast Loading Google Fonts
  • 3 Column Footer Widgets
Note : - I am giving this template to you in free.I don’t want anything from you but please don’t remove our link from footer of this template.

Demo                                       Download

Download

Friday, 10 May 2013

Add Google Talk on Blogger | GTalk Widget on Blogspot Blog


Today, most users have a Google account, which allows you to use Google Talk, the messenger through which we can interact / chat with other users. Fortunately, We can add Google Talk Widget to your blog so that visitors can exchange messages with us.
Good thing about this Google Talk Widget is that you only need to have a Google account to add the widget, preventing your visitors from the need of a separate account.
With Google Talk widget, we can chat with multiple people simultaneously, having a tab for each conversation and offering the chance to show our state to help our users know whether we are reachable at the moment or not.
The style of Google Talk widget is similar to the Gmail interface, so it’s not very complicated to use, and the status to choose are: Available, Busy and Offline.
Once, HTML code is embedded, it is not necessary that your visitors install any additional plugin, we just copy the code and paste it into the desired location on our blog (sidebar preferably).
The Google Talk Widget is free and the only requirement is of course, have a Google account, through which we can have improvements such as integration with Gmail and the newly added invisible mode.
widget google talk Add Google Talk on Blogger | GTalk Widget on Blogspot Blog
Press on Select the code button below and copy the code. Login to Blogger Dashboard and in Design / Template Elements page, add new Javascipt/HTML gadget. Paste this code and you are done.

For any problems with the embed code or installation, feel free to comment

Different Types of Affiliate Marketing Programs You Can Earn Money From


In my recent post; Affiliate Marketing Program On The Internet: How Does It Works?; I detailed the meaning of affiliate marketing and explained the roles of the main actors involved in an affiliate program transaction. However, I didn't explain the basic types of affiliate programs. That’s what I’m here to share with you today.

Over the past few years, affiliate programs have grown so much, taking many interesting forms. The most basic affiliate marketing programs, however, falls under two categories: 
  1. pay-per-click (PPC), and 
  2. pay-per-performance (PPP).

1. Pay-Per-Click (PPC) Affiliate Program

This is the easiest type of affiliate marketing in which affiliates earn money whenever a visitor is referred to a merchant site. The referred visitors don't have to buy anything before the affiliate will get paid and what the visitor does on the merchant site doesn't concern the affiliate. 

If you promote a PPC affiliate program, you will get paid a certain amount even if the visitor you refer doesn't buy anything from the merchant's site. What you will earn per click might not be up to a dollar though. 

2. Pay-Per-Performance (PPP) Affiliate Program

This is the type of affiliate program preferred by majority of merchants because merchants will pay affiliates ONLY when the referred visitors perform an action. 

PPP affiliate program can be further classified into two popular types:  
  • pay-per-sale (PPS)
  • pay-per-lead (PPL). 

Pay-Per-Sale

In this arrangement, affiliates get paid when the visitors referred to merchant's sitepurchase something. Merchant pay affiliates a percentage of the sale price when the purchase is completed. Amazon.com's affiliate program is an example of PPS affiliate program. 

Pay-Per-Lead

 In this program, affiliates get paid once the referred visitors provide their contact information on the merchant's site by filling out a simple form related to the business of the merchant.

The merchant may use the info as a sales lead or sell to another company as a sales lead. PPL is often used by finance companies and other companies who rely on leads for their company to grow.


Aside from these basic types of affiliate marketing, a lot of other affiliate marketing types exist. Just pick one which you think would suit you best. You can also venture into multiple types at the same time to find out which ones are right for you.

You might think it is easy, but in reality, you need to put in a lot of effort at first for affiliate marketing to work. Once you finally know your way through it, your affiliate marketing venture can turn from being an additional source of income on the internet to being your primary financial source.

I hope this helps.

In my next post, I will share with you, how I am making money from affiliate programs in Nigeriahow to join affiliate networks, as well as how to acquire affiliates for your online businesses.

Wednesday, 8 May 2013

How To Add 125×125 Banner Ads Slots To Blogger

125x125

125x125

B
logging is best way for making money online, most of people use google adsense for it, but what if google adsense not approved or disabled? no worry, there are many ways to make money while working online. and there are many advertisement companies like buysellads, Qadabra, Infolinks, chitika… etc also If your blog have good alexa rank (Under 90k) and Google Page Rank (3+) then advertisers will contact you, that you can make money by advertising on your blog, sidebar is the best place for ads, You’ve must have seen 4 125X125 Ad slots on the sidebar of many popular blogs, Most of them are hosted on WordPress. In this post I’ll show you How to put 125X125 Banner widget on Blogger hosted blogs, i have designed 2 different 125×125 advertising slots by help of CSS and HTML, you can select the one which you prefer. you can see the above both images as example.

How to add 125×125 Ads slots to blogger?

  • as usual go to blogger–>layout–>add a gadget
  • Choose HTML/Javascript from the list
  • Copy and paste below code just into it

Simple

<table border="0"  cellpadding="2" cellspacing="6" width="265" bgcolor="#fff"><tbody>
<tr>
<td>
<center>
<a href="Advertiser URL" rel="nofollow">
<img border="0" alt="AD DESCRIPTION" width="125" src="https://blogger.googleusercontent.com/img/b/R29vZ2xl/AVvXsEh7rB3uNUmN94uNw5VsUzecSDnF8ELC8AmTD7dajANgsTWcTJKi4Nu_hLoFNUFfRjwQ7V-7LpyFuRGUN60p5mB5JUXRZAijzzQdu-oQM1_aexnIH5_Hp-K6_PVvDL-Rs1jIiKDNp4lhh3o/s1600/ad-here.png" height="125"/></a>
</center>
</td>
<td>
<center>
<a href="Advertiser URL 2" rel="nofollow">
<img border="0" alt="AD DESCRIPTION" width="125" src="https://blogger.googleusercontent.com/img/b/R29vZ2xl/AVvXsEh7rB3uNUmN94uNw5VsUzecSDnF8ELC8AmTD7dajANgsTWcTJKi4Nu_hLoFNUFfRjwQ7V-7LpyFuRGUN60p5mB5JUXRZAijzzQdu-oQM1_aexnIH5_Hp-K6_PVvDL-Rs1jIiKDNp4lhh3o/s1600/ad-here.png" height="125"/></a>
</center>
</td>
</tr>
<tr>
<td>
<center>
<a href="ADVERTISER URL 3" rel="nofollow">
<img border="0" alt="AD DESCRIPTION" width="125" src="https://blogger.googleusercontent.com/img/b/R29vZ2xl/AVvXsEh7rB3uNUmN94uNw5VsUzecSDnF8ELC8AmTD7dajANgsTWcTJKi4Nu_hLoFNUFfRjwQ7V-7LpyFuRGUN60p5mB5JUXRZAijzzQdu-oQM1_aexnIH5_Hp-K6_PVvDL-Rs1jIiKDNp4lhh3o/s1600/ad-here.png" height="125"/></a>
</center>
</td>
<td>
<center>
<a href="ADVERTISER URL 4" rel="nofollow">
<img border="0" alt="AD DESCRIPTION" width="125" src="https://blogger.googleusercontent.com/img/b/R29vZ2xl/AVvXsEh7rB3uNUmN94uNw5VsUzecSDnF8ELC8AmTD7dajANgsTWcTJKi4Nu_hLoFNUFfRjwQ7V-7LpyFuRGUN60p5mB5JUXRZAijzzQdu-oQM1_aexnIH5_Hp-K6_PVvDL-Rs1jIiKDNp4lhh3o/s1600/ad-here.png" height="125"/></a>
</center>
</td>
</tr>
</tbody>
</table>

Stylish

<style>
#MD-ads img {
margin: 0px 8px 4px 0px;
padding: 3px;
text-align: center;
border: 3px solid #c0c0c0;
-webkit-border-radius:70px;
-moz-border-radius:70px;
-o-border-radius:70px;
border-radius:70px;
-webkit-transition: all 0.45s ease-out;
-moz-transition: all 0.45s ease-out;
-o-transition: all 0.45s ease-out;
transition: all 0.45s ease-out;
}
#MD-ads img:hover {
margin: 0px 8px 4px 0px;
padding: 3px;
text-align: center;
border: 3px solid #c33f00;
-webkit-border-radius:0px;
-moz-border-radius:0px;
-o-border-radius:0px;
border-radius:0px;
}
</style>
<div id="MD-ads" align="left">
<table border="0"  cellpadding="2" cellspacing="6" width="265" bgcolor="#fff"><tbody>
<tr>
<td>
<center>
<a href="Advertiser URL" rel="nofollow">
<img border="0" alt="AD DESCRIPTION" width="125" src="https://blogger.googleusercontent.com/img/b/R29vZ2xl/AVvXsEh7rB3uNUmN94uNw5VsUzecSDnF8ELC8AmTD7dajANgsTWcTJKi4Nu_hLoFNUFfRjwQ7V-7LpyFuRGUN60p5mB5JUXRZAijzzQdu-oQM1_aexnIH5_Hp-K6_PVvDL-Rs1jIiKDNp4lhh3o/s1600/ad-here.png" height="125"/></a>
</center>
</td>
<td>
<center>
<a href="Advertiser URL 2" rel="nofollow">
<img border="0" alt="AD DESCRIPTION" width="125" src="https://blogger.googleusercontent.com/img/b/R29vZ2xl/AVvXsEh7rB3uNUmN94uNw5VsUzecSDnF8ELC8AmTD7dajANgsTWcTJKi4Nu_hLoFNUFfRjwQ7V-7LpyFuRGUN60p5mB5JUXRZAijzzQdu-oQM1_aexnIH5_Hp-K6_PVvDL-Rs1jIiKDNp4lhh3o/s1600/ad-here.png" height="125"/></a>
</center>
</td>
</tr>
<tr>
<td>
<center>
<a href="ADVERTISER URL 3" rel="nofollow">
<img border="0" alt="AD DESCRIPTION" width="125" src="https://blogger.googleusercontent.com/img/b/R29vZ2xl/AVvXsEh7rB3uNUmN94uNw5VsUzecSDnF8ELC8AmTD7dajANgsTWcTJKi4Nu_hLoFNUFfRjwQ7V-7LpyFuRGUN60p5mB5JUXRZAijzzQdu-oQM1_aexnIH5_Hp-K6_PVvDL-Rs1jIiKDNp4lhh3o/s1600/ad-here.png" height="125"/></a>
</center>
</td>
<td>
<center>
<a href="ADVERTISER URL 4" rel="nofollow">
<img border="0" alt="AD DESCRIPTION" width="125" src="https://blogger.googleusercontent.com/img/b/R29vZ2xl/AVvXsEh7rB3uNUmN94uNw5VsUzecSDnF8ELC8AmTD7dajANgsTWcTJKi4Nu_hLoFNUFfRjwQ7V-7LpyFuRGUN60p5mB5JUXRZAijzzQdu-oQM1_aexnIH5_Hp-K6_PVvDL-Rs1jIiKDNp4lhh3o/s1600/ad-here.png" height="125"/></a>
</center>
</td>
</tr>
</tbody>
</table>
</div>
Choose any one which you perfer you can test or edit it by using our HTML editor

Things to Replace

1: If you want to increase Distance between Ads then change width=”256″
2: Replace ADVERTISER URL with the Ad link
3: Replace https://blogger.googleusercontent.com/img/b/R29vZ2xl/AVvXsEh7rB3uNUmN94uNw5VsUzecSDnF8ELC8AmTD7dajANgsTWcTJKi4Nu_hLoFNUFfRjwQ7V-7LpyFuRGUN60p5mB5JUXRZAijzzQdu-oQM1_aexnIH5_Hp-K6_PVvDL-Rs1jIiKDNp4lhh3o/s1600/ad-here.png with Banner image link
4: Replace AD DESCRIPTION with Description about Ad, When someone will hover mouse He’ll see the Ad info.
5:you can change border color in above stylish widget by editing into css.
6: Replace bgcolor=”#fff with background color of widget.
Now you’ll be able to see four Ad slots on your Blog. Hope you liked my tutorial, Please take a few seconds to share it or leave a comment below. :D 

Change Blogposts Title on Blogger Blog To Make SEO Friendly


Yes, Now you can change the Title of the blogposts on individual post-view. You might have seen that I’ve changed the Title of my homepage to “Tech blog for Blogger tricks, widgets, templates, adsense tips and much more.” This trick can help in boosting your search engine rankings.
By default, your Blogger’s title on the top left displays your blog title, and if it’s in the items page, it’ll include your post title as well. eg, NetRivar:Change the blog title for blogposts. By copying the coding from below, you can change the default behavior of the title tag.
Name of Blog isn’t necessary to come at the beginning instead title of the article being viewed is important. Many Blogger templates come inbuilt with this modification but if yours doesn’t then follow the steps below to make your Blog articles title more SEO friendly and gain more traffic from Google and other Search engines.
Step 1-Goto Blogger Dashboard>>Layout>>Edit Html
Step 2-Backup your template
Step 3-Follow the instructions below
Find this Code :
<head>
<b:include data=’blog’ name=’all-head-content’/>
<title><data:blog.pageTitle/></title>
Then change this code with code Trick to make your Blog is SEO Friendly
bellow :
<head>
<b:if cond='data:blog.pageType == &quot;item&quot;'>
<title><data:blog.pageName/> | <data:blog.title/></title>
<b:else/>
<title><data:blog.pageTitle/></title>
</b:if>
<meta content=’Your Blog Description.‘ name=’description’/>
<meta content=’ Your Blog KeyWords.‘ name=’Keywords’/>
<meta content=’global’ name=’target’/>
<meta content=’Index,follow’ name=’Robots’/>
<meta content=’ALL’ name=’SPIDERS’/>
<meta content=’ALL’ name=’WEBCRAWLERS’/>
<!– End Widget-based: Changing the Blogger Title Tag –>
Further more you can add a very good keyword in homepage’s title by just adding Keyword + Blog Title by finding this line in the above code{3rd last}-
<b:else/>
<title><data:blog.pageTitle/></title>
</b:if>
and adding keyword here
<b:else/>
<title> <data:blog.pageTitle/>Keyword</title>
</b:if>
Be creative in writing Keyword, it will surely help your blog grow and also for search engine optimization.
- See more at: http://netrivar.blogspot.in/2013/05/change-blogposts-title-on-blogger-blog_7448.html#sthash.g2Dbrqtz.dpuf

Simple Recent Posts Widget For Blogger / Blogspot / WordPress Blog


Recent Posts Widget on Sidebar is a novelty feature and most of the time recommended for letting first time visitor or even regular reader to go through recent articles published without heading on to homepage of Blog. So, here is how you can add Recent Posts Widget to your Blog.

How to Add Recent Widgets on Blogger / Blogspot

Here’s the simplest Recent Posts Widget listing recent 10 articles of your blog. Summary of the articles is optional which can be triggered ON by editing the code.
  1. Click on “Add Recent Post Widget Gadget” button, this will redirect you to Blogger “Add Elements” Page.
  2. Select the blog where Widget to be installed
  3. Edit Content and replace yoursitename from the code with your blog’s name.
  4. Hit “Add Widget” button and you are done.
add recent posts blogger widget Simple Recent Posts Widget For Blogger / Blogspot / Wordpress Blog
Widget is configured to show recent 10 articles but it is customizable.
Other attributes which can be edited are:
  • var numposts = 10 ( where 10 is Number of Recent Posts )
  • showpostdate = false (Make it true if you want to show Date of publish)
  • showpostsummary = false (Toggle it true if you want to show Summary of article too in widget)
  • numchars = 100 (where 100 is Number of characters in Summary)
I hope the guidelines are clear and you could add the Recent Post widget easily on your Blogspot blog.

How to Add Recent Posts Widget to WordPress

WordPress has by default “Recent Posts” Widget. Just Login to WordPress Dashboard and head on to “Widgets” under Appearance. Now drag the Recent Posts widget where you want it to be displayed.
- See more at: http://netrivar.blogspot.in/2013/05/simple-recent-posts-widget-for-blogger.html#sthash.UG2svtrW.dpuf

Which area of your blog appeals most?


Feng-GUI is an application online somewhat curious since generates heat with a map of the most striking design of a blog or web, ie from a snapshot, you get those areas with a greater contrast of colors and So which are the most striking to your readers.
 Which area of your blog appeals most?However, when I tried on webdale, I saw that my blog has sensitive areas or those areas which cathches the sight of a visitor. First impression is of my heade image then post-date and the feedicon on top-right corner.
This theory would have to be something to distinguish with the naked eye, but this tool can give us some surprises. A utility map for this heat, is whether the design is in accordance with the priorities that we set for each section of your blog, so that those of greatest importance are properly highlighted.
How it works?
You just have to open feng-gui webpage and provide the URL of blog or website; moreover you can also upload any image if you want as this method works on the snapshot of your page.
- See more at: http://netrivar.blogspot.in/2013/05/which-area-of-your-blog-appeals-most.html#sthash.h0dEuyH9.dpuf

Affiliate Marketing Program On The Internet: How Does It Works?


If you have been googling, "How can I make money online from my website", there is no way you won't have stumbled on the the idea of been anInternet Affiliate Marketer.

There are a huge number of affiliates earning full-time incomes on the internet fromaffiliate marketing, and a lot of affiliates doing considerably more than that! You too, can.


So, What is Affiliate Marketing?

In a nutshell, it is a practice where you (as an affiliate) get paid for referring sales or customers to an online merchant web site.

You post links, ad banners linking to the merchant site on your website and earn commission for your marketing efforts.


There are at least three actors in an affiliate program transaction:

A: Merchant site = Seller or service provider e.g Jumia Nigeria
B: Affiliate = You
C: Customer = could be your friend, relative, or an unknown person (e.g blog reader)

  
Why would actor "A" (Merchant Site)  Pay me?    

"A", the merchant has products to sell and is looking for a cheaper way to market the products instead of using traditional advertising. The merchant decides to partner with you, so you can introduce their products to people that trust you. 

Since "C" (customer) is not familiar with "A",  "C" is often skeptical of buying any product from an unknown company. "A" is aware of this fact and also knows that "C" trusts you. After all,  if your friends receive an email from you, won`t they open it?.

So "A" partners with you, to use your goodwill to introduce their products to "C".  No doubt,  "C" would show interest in your offers because of your familiarity.

Now, "A" is prepared to pay you commission per transaction with you for referring  "C" to their products. "A" generates unique links, ad banners etc for you which you can be using to promote their products.

You decided to give it a try. You register with the merchant affiliate program, grab your unique affiliate links and post them on your blog, Facebook, Twitter etc

When "C" visits the merchant site via your unique affiliate link and purchase the product of "A", "A" pays you your commission which can pile up to a particular amount before "A" sends your payment to you to your PayPal account or in form of check.

That's all. 


Over the past few years, affiliate programs have grown enormously in popularity, taking many interesting forms. In my next post, I will share with you, the basic types of affiliate programs

More so, I will share with you, affiliate programs that I am making money fromhow to join affiliate networks, as well as how to acquire affiliates for your internet businesses.

Just make sure you subscribe to this blog if you don't want to miss the affiliate marketing articles.
 

Net Everythings Copyright © 2011 -- Template created by O Pregador -- Powered by Blogger